AWS Datasource Installation
Serverless
Start by deploying the serverless components:
- Clone the SNOWWATCH github repo
- Open a terminal and
cdto thedatasources/aws/serverlessdirectory - Make sure you have npm installed. This package manager is used to download the Serverless Framework CLI.
- Run
npm ito install the required dependencies into your current directory. - Run the following code to confirm everything is working smoothly. This will create deployable artifacts in the
.serverlessdirectory in the current directory.
./node_modules/serverless/bin/serverless package --account_id <your aws account id> --aws_config_profile_name <the profile name in your ~/.aws/config file containing the credentials you'd like to use for deployment>Make sure to put in your own values. For example:
./node_modules/serverless/bin/serverless package --account_id 12345 --aws_config_profile_name adminProfileExamine the resulting cloudformation templates in
./.serverlessto ensure things look right before deploying.
- Run the following code to deploy to AWS
./node_modules/serverless/bin/serverless deploy --account_id <your aws account id> --aws_config_profile_name <the profile name in your ~/.aws/config file containing the credentials you'd like to use for deployment>Make sure to put in your own values. For example:
./node_modules/serverless/bin/serverless deploy --account_id 12345 --aws_config_profile_name adminProfileAt this point, the AWS datasource serverless application should be deploying to AWS Cloudformation. Your monitoring data can be viewed in the
snowwatch-<your aws account id>S3 bucket.
NOTE: The AWS config profile that you use will need to have some level of AWS admin priveleges in order to deploy the serverless components.
This will deploy the necessary AWS components to your AWS
Snowflake
Log in to your Snowflake acccount and open a new worksheet.
If this is your first SNOWWATCH datasource, run the initial setup script here. This script will need to run by one of your Snowflake admins. Ensure that your admin grants usage of the SNOWWATCH_ROLE to you.
Next, you’ll need to gather some text values before running the setup SQL for this datasource. You’ll need:
- the name of your serverless S3 bucket where monitoring reports are saved. This should be
snowwatch-<your aws account id>. For example,snowwatch-12345. - The AWS Key ID and Secret Key credentials you want Snowflake to use to access your S3 bucket. While there are other ways to grant Snowflake access to your AWS resources, this is the method Hashmap uses when building scripts. For information on how to set this up, and which IAM policies to assign to the owner of these credentials, see Snowflake’s instructions here
Once you have these values, open a new worksheet in Snowflake and paste this AWS Setup SQL script into the worksheet. Place your S3 Bucket Name, AWS Key ID, and AWS Secret Key in the appropriate parts of the SQL script in the CREATE STAGE ... command.
Lastly, you’ll need to create the LANDING_ZONE tables where your AWS monitoring data will be stored and setup your automated ingestion logic. To do this, run each SQL script here in its own Snowflake worksheet (do yourself a favor and name the worksheets to match the SQL script filenames).
The final command in each of the ingestion setup SQL scripts will display details about the current snowpipe. This information will include an AWS ARN to an SQS channel that the snowpipes are monitoring for new files. Unfortunately, to connect new data events to your snowpipes, you must manually add each snowpipe to your S3 bucket’s notifications list. Luckily, each pipe has the same SQS ARN (because they share a stage).
Copy the ARN of the SQS queue that your snowpipes are monitoring and go to your snowwatch-<your aws account id> S3 bucket in the AWS web console. Go to the Properties Tab and select Events:
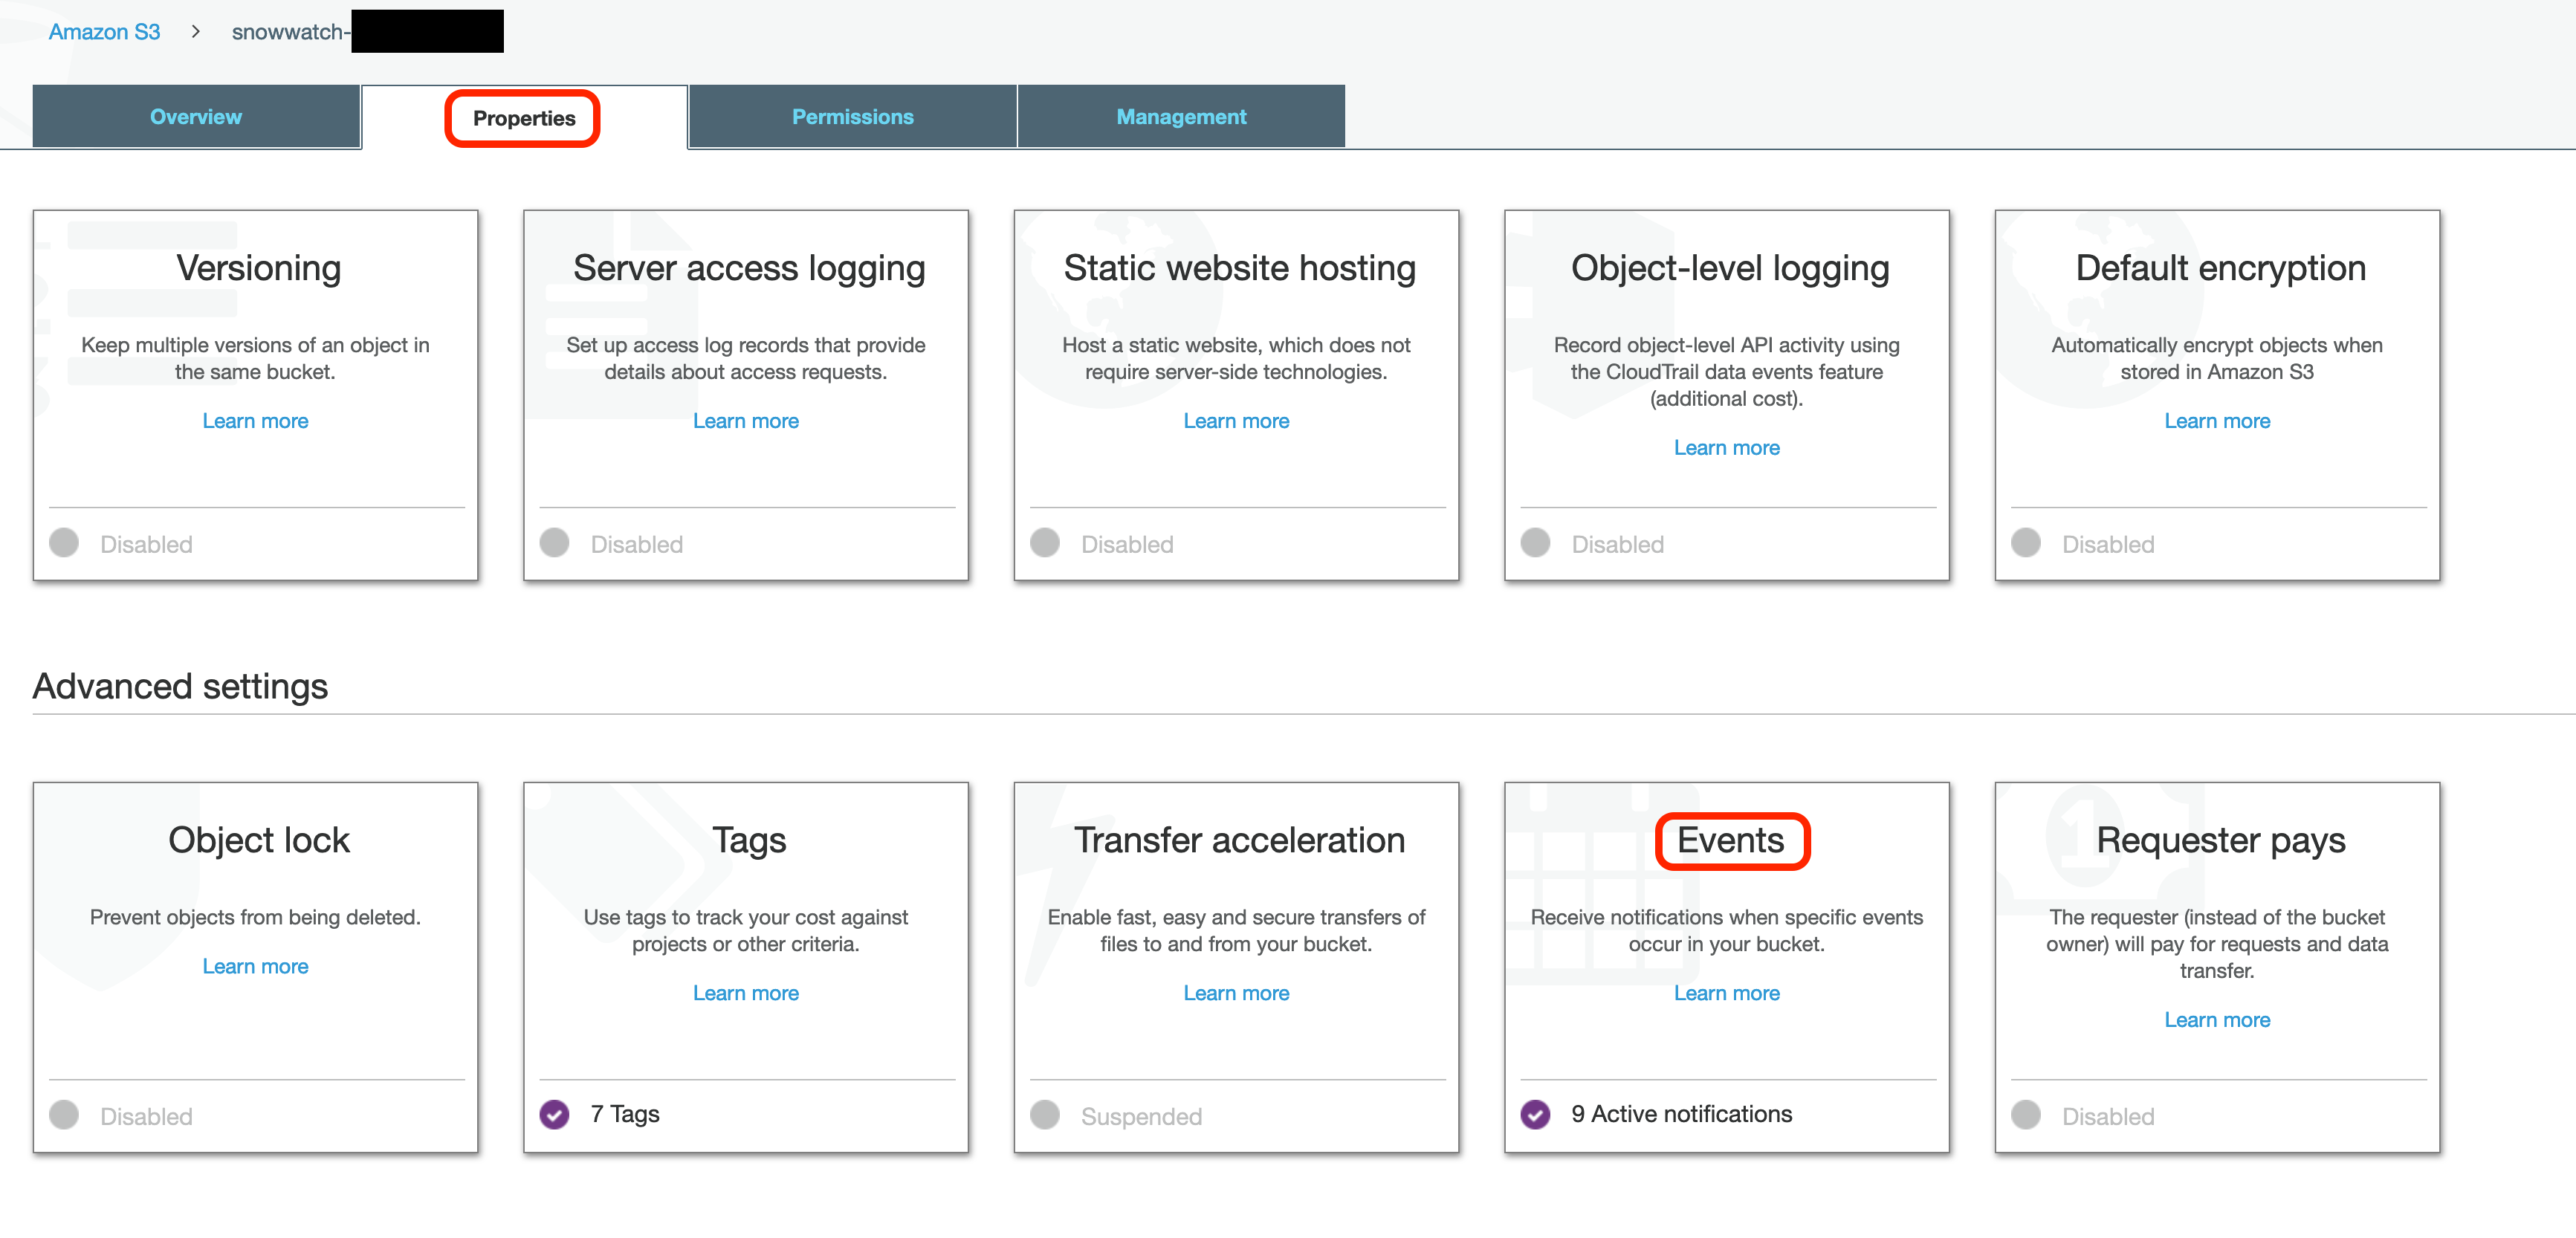
You should notice that there is already an event on your S3 bucket created by the Serverless deployment to react to new log creation from Cloudtrail.
Select Add notification and enter the following information:
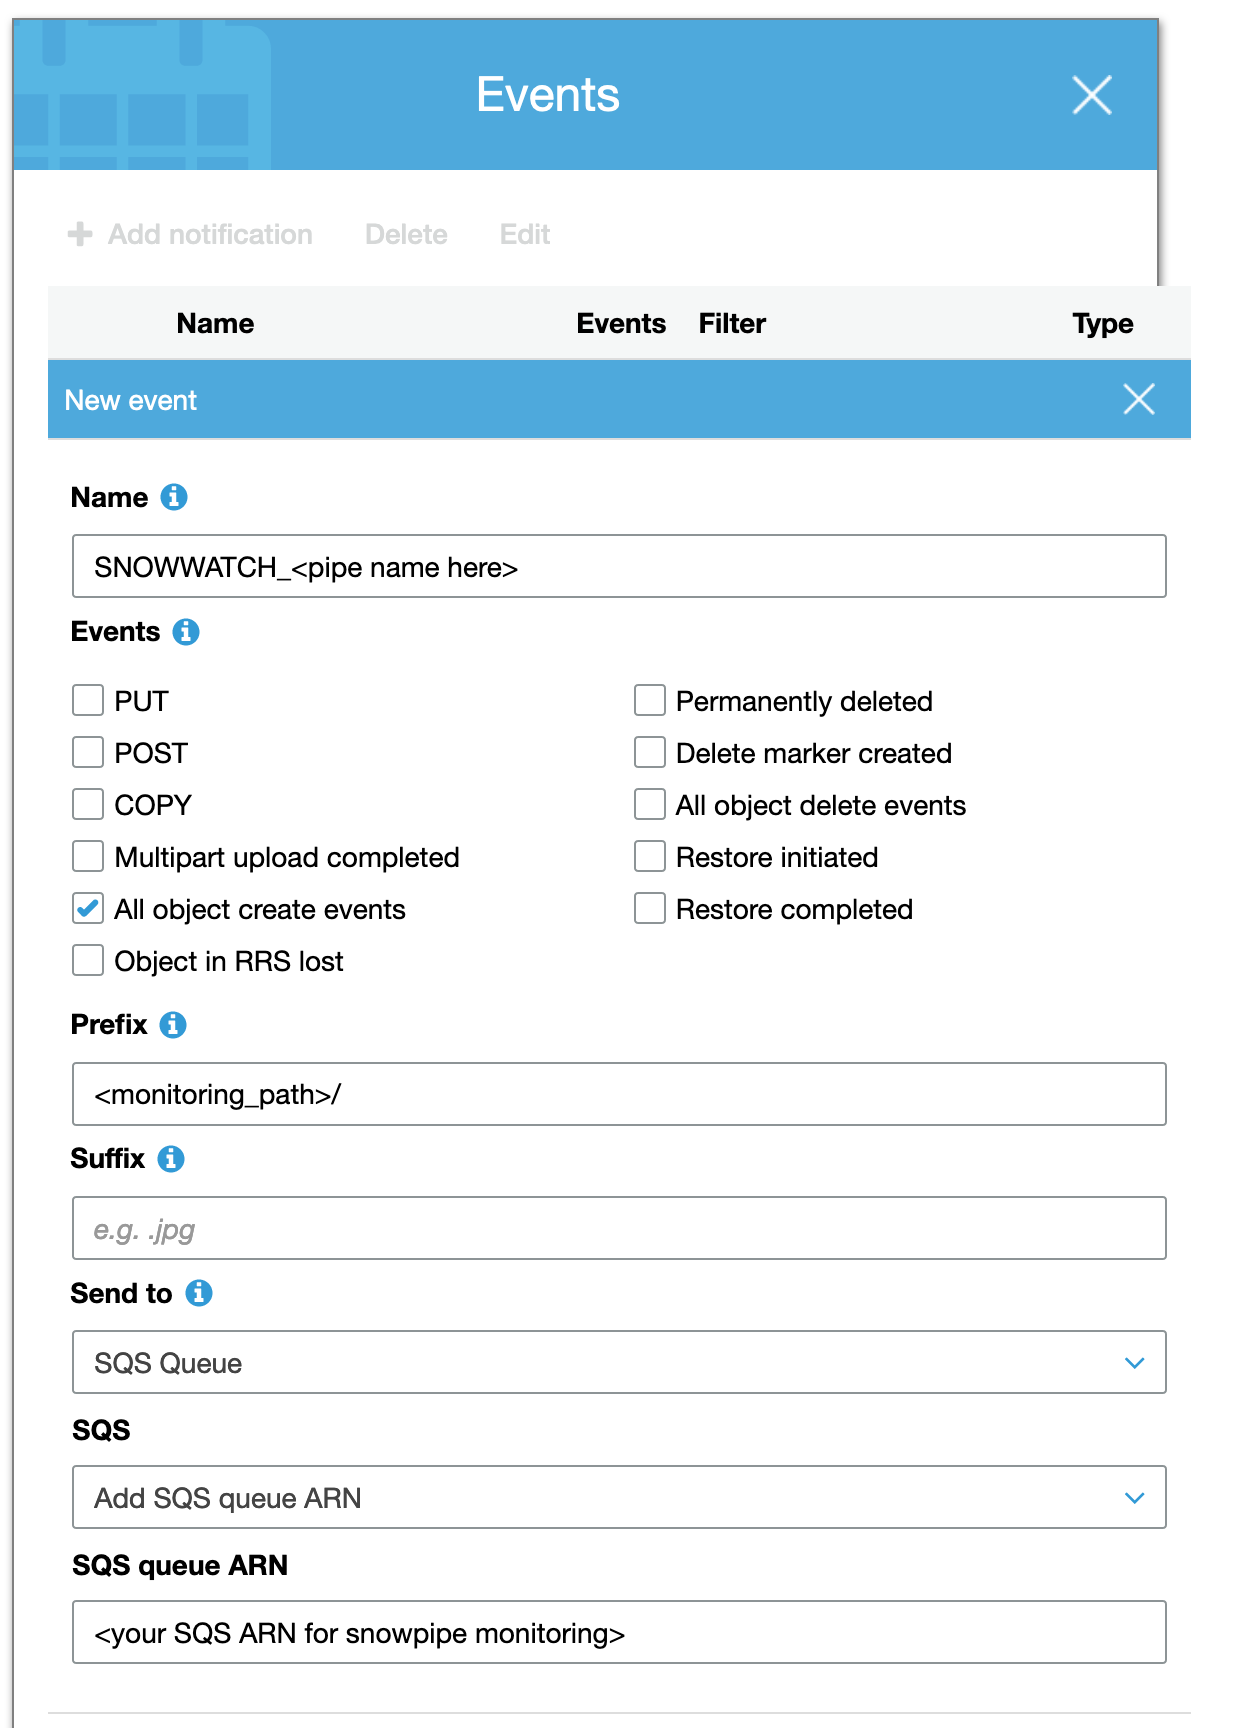
You will have to create 8 total event notifications; 1 for each snowpipe. Each will share the same SQS ARN, but will have the following values:
| Event Name | Prefix |
|---|---|
| SNOWWATCH_CLOUDTRAIL_MONITORING_PIPE | cloudtrail_monitoring/ |
| SNOWWATCH_EC2_MONITORING_PIPE | ec2_monitoring/ |
| SNOWWATCH_ELB_MONITORING_PIPE | elb_monitoring/ |
| SNOWWATCH_SECURITY_GROUP_MONITORING_PIPE | security_group_monitoring/ |
| SNOWWATCH_IAM_USER_MONITORING_PIPE | iam_monitoring/users/ |
| SNOWWATCH_IAM_ROLE_MONITORING_PIPE | iam_monitoring/roles/ |
| SNOWWATCH_IAM_GROUP_MONITORING_PIPE | iam_monitoring/groups/ |
| SNOWWATCH_IAM_POLICY_MONITORING_PIPE | iam_monitoring/policies/ |
When you have finished, your SNOWWATCH database should look like the following:
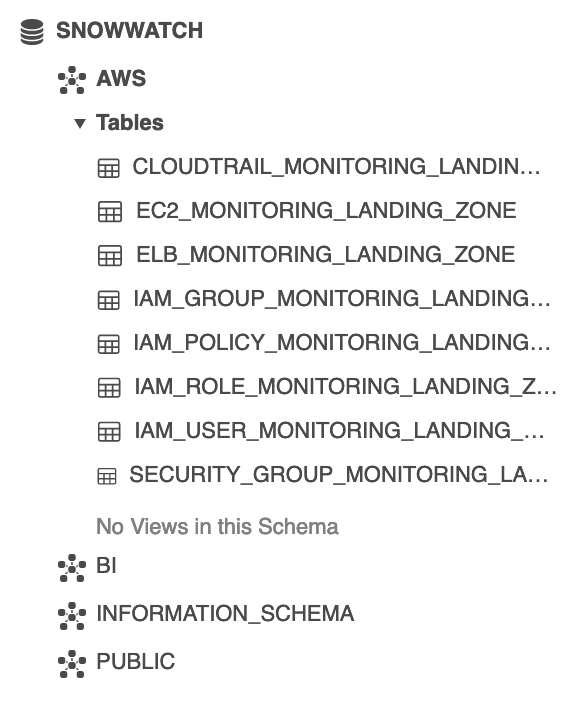
Data will now arrive automatically in your landing tables as new monitoring reports are generated in AWS.